3D Printing Overview
Complete guide to printing and preparing all parts for your Fabrica build
What You Will Build
In this section, you will 3D print all the structural parts needed to build your Fabrica cloth folding robot. The robot is composed of four modular units — motorized modules that drive the folding action, follower modules that extend the folding surface, base modules that provide a stable foundation, and an interface module that houses the electronics and controls. Together, these 15 printable parts form a complete, fully functional garment-folding system.
Because Fabrica is fully modular, you're not limited to a single configuration. You can print additional modules and arrange them in any grid layout — 4×4, 4×5, 5×5, or any custom arrangement that fits your needs. Want a wider folding surface for bed sheets? Add more follower modules. Need extra folding axes? Print more motorized modules. The system scales in any direction, so you can tailor the size and folding capability of your robot to match the garments you work with most.
Each motorized module can be individually programmed through the interface module to fold in parallel (multiple panels folding simultaneously) or sequential (one after another in a defined order). This gives you complete control over the folding sequence — program any combination of movements to handle different garment types. The system supports up to 16 motorized modules connected to a single interface, giving you the flexibility to build anything from a compact shirt folder to a large-scale industrial folding station.
Four Module Types, One Complete System
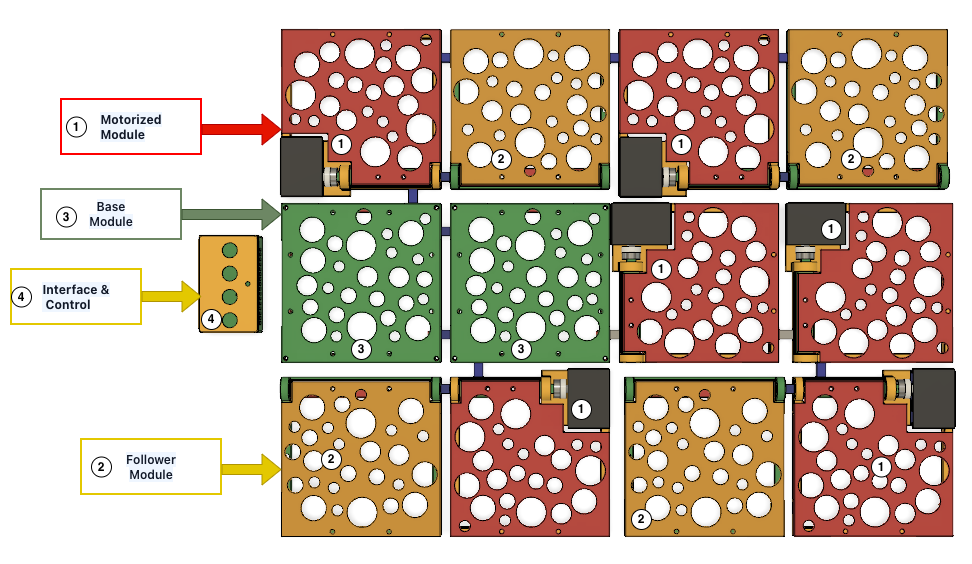
The image above shows a 4×3 layout with 6 motorized modules (red) for active folding, 4 follower modules (orange) for extended surface area, 2 base modules (green) for foundation support, and 1 interface module (orange accent) for user control. This is just one example — you can arrange modules in any grid configuration (4×4, 4×5, 5×5, or any custom layout) to match your folding needs.
The Four Module Types
Each module serves a specific purpose in the folding system. Click any module below to view detailed 3D files, print settings, and assembly instructions for that component.
Motorized Module
The active folding unit powered by servo motors. Contains the drive mechanism that physically lifts and folds garments. These are the “muscle” of your robot that perform the actual folding motion.
Follower Module
Hinged panels that move with motorized units but require no motors themselves. These expand your folding area without adding cost or complexity, perfect for larger garments.
Base Module
Fixed panels that provide the landing surface for folded garments. No motors, no shafts—just stable support structure. The simplest and quickest module to print and assemble.
Interface Module
Houses the Raspberry Pi Pico 2W and control electronics. Features the 4-button interface with LED for programming and operating the robot. Your robot's control center.
Complete Build:
Print Settings & Tips
Recommended Settings
Basic Settings
- Material:PLA or PETG
- Layer Height:0.2-0.3mm
- Infill:20-30%
- Wall Lines:3-4
- Top/Bottom Layers:4-5
Advanced Settings
- Supports:Required for some parts
- Brim:Recommended
- Print Speed:50-60mm/s
- Retraction:5-6mm @ 40mm/s
- Cooling:100% (after layer 1)
PLA (Recommended)
Ideal for most builders. Easy to print with minimal warping, provides sufficient structural strength, and is widely available at affordable prices.
- •Easy to print, minimal warping
- •Good dimensional accuracy
- •Lower cost ($15-25/kg)
- •Sufficient strength for servos
PETG (Alternative)
Offers superior impact resistance and heat tolerance for enhanced longevity. Recommended for builds requiring extra durability.
- •More impact resistant
- •Better heat resistance
- •Longer lifespan
- •Requires higher temps (230-250°C)